7 Simple Ways to Practice Sewing Straight Line Stitches Straight line stitching How many times have…
Sewing Clothes – How to Make Yours Not Look Homemade

 Sewing clothes that look professional is always the result that anyone who sews want to achieve, but often missed. It does not have to be that way. In fact, if you use the proper tools to press and shape your garment as you sew, you can make fashionable clothes at home that does not look homemade. Most of us will agree that sewing your own clothes saves you money and brings much satisfaction, but you don’t want anyone to tell you it looks homemade.
Make handmade clothes look professional
It is very gratifying when you complete a project and can say that you sewed yourself. But, perhaps the biggest reason most people do not sew their own clothes is because they look homemade. You start out with visions that the outfit will look exactly on you the way it looks on the pattern envelope, but when you’ve finished it, it looks like something went terribly wrong. And, you can’t quite put your finger on what that is exactly; you know that you followed the sewing instructions provided.
I can remember staying up through the night to finish sewing an outfit just so I would have something new to wear the next day. Even though I thought I looked cute in my new outfit, I still felt that everyone could tell that I’d just thrown something together the night before. The only time the iron had touched my garment during the sewing process was when it was finished, and then I really ironed it hard…I mean, really hard. I didn’t know what was missing until I stepped into a Home Economics sewing class, and the teacher explained the use of a bunch of odd-looking tools laying on the ironing board.
The secret to sewing clothes that look professional
What I learned in that class, was the secret to making home sewing look professional. It was all in the pressing and shaping the garment as it was being sewn with those odd-looking tools. I didn’t know that if I waited until the garment was finished to press it, then it would be too late to set in the shape. I didn’t know that no matter how well I sewed, that I would not get the professional look I wanted without pressing properly.
Yes, properly pressing seams as you sew actually shapes the garment and sets the stitching lines. As we all know, the body is not flat; it has curves, and using a flat ironing board will not shape the garment properly. The only way to shape your garment is by using the proper pressing equipment along with the ironing board.
Proper sewing tools make a difference
If you are like me, and most fashion sewers, before taking a sewing class,
you may be unfamiliar with specialized pressing equipment and unaccustomed to using them. But, using the proper sewing tools along with the proper techniques makes the difference in the end result. It helps shape the fabric so it will fit the body more smoothly.
Pressing is different from ironing. When most of us iron, we use a back and forth motion moving the iron over the fabric. In pressing, the iron is lowered to the area to be pressed with the seam placed over the proper piece of equipment, then raised off the fabric and moved to the next area to repeat the process.
The tools used to get professional-looking clothes
The proper tools used for pressing a garment to help with sewing clothes that look professional are listed below:
- Steam Iron, that has the ability to produce high-pressure blasts of hot, dry steam to press and shape fabric, and set stitches at all stages of construction.
- Ironing Board, that’s well padded and smoothly covered in a 100% cotton cover to absorb moisture from the steam iron.
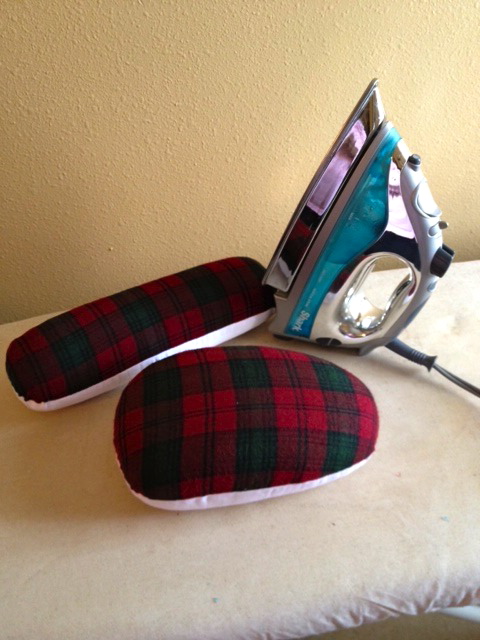
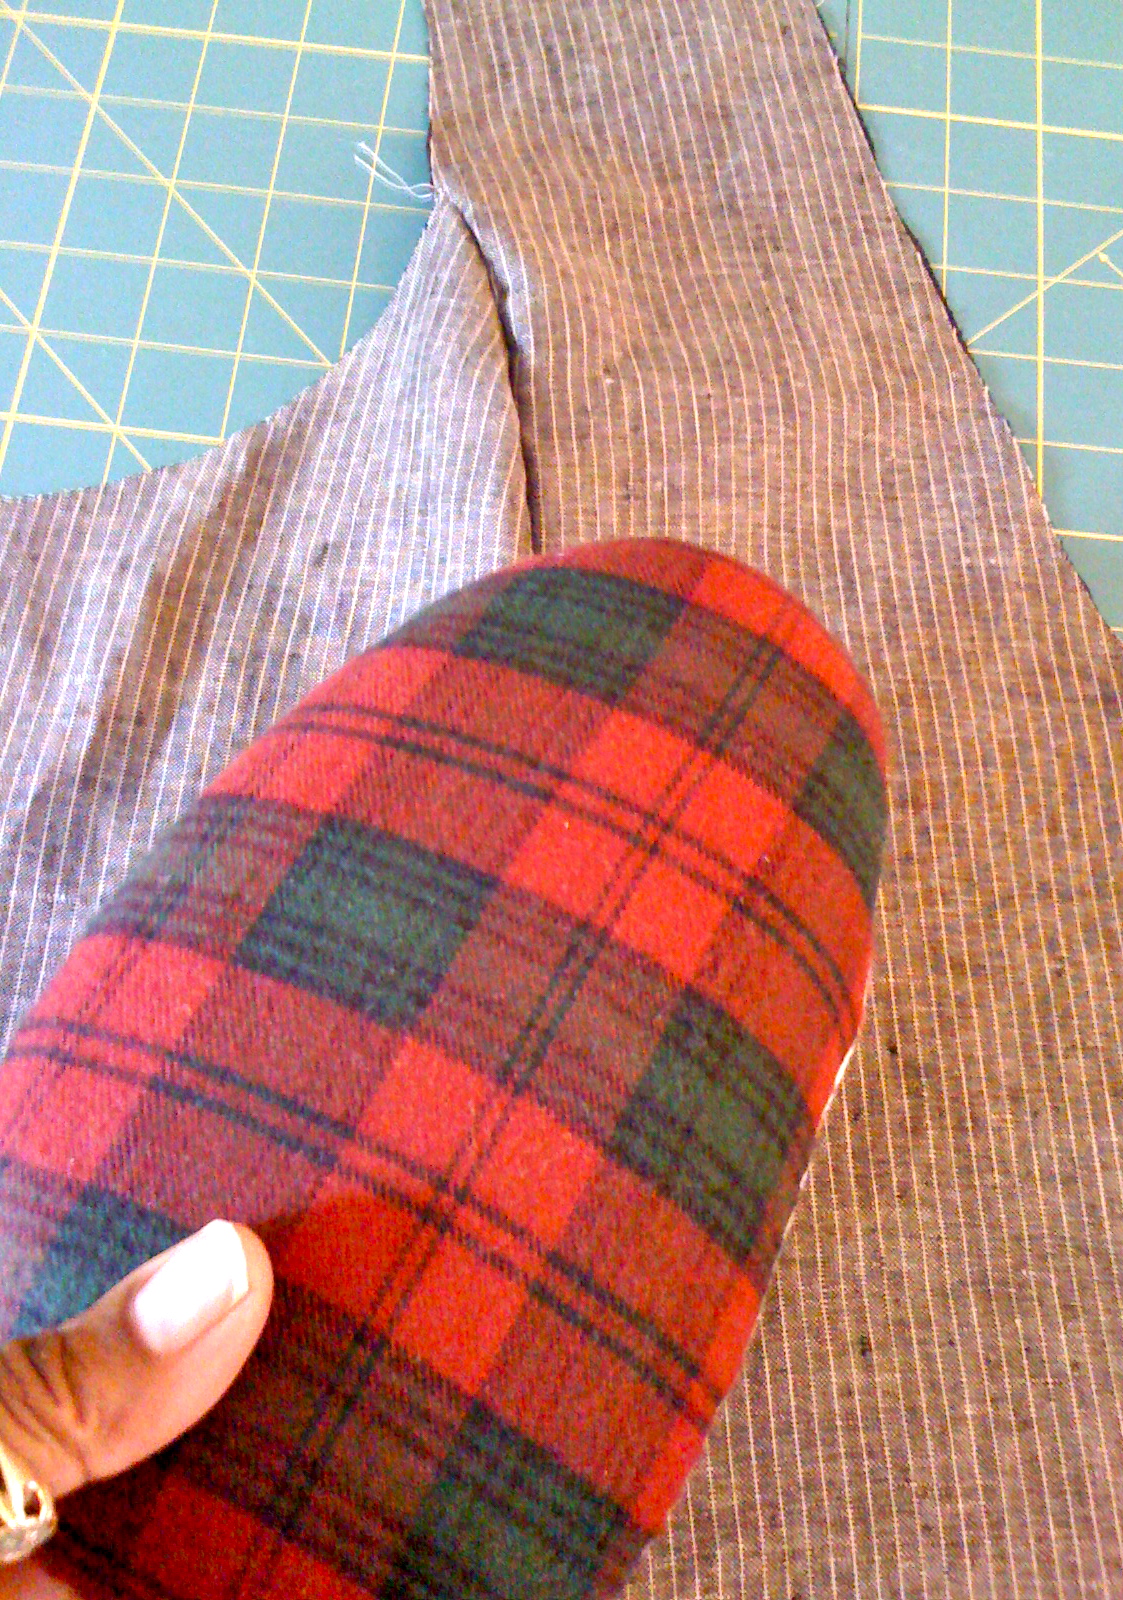
- Tailor’s Ham, is a tightly stuffed wool pillow shaped like a ham for pressing shaped areas and curved seams. It’s used in pressing and shaping parts of a garment that need to have shape or curves built into them, which are mostly the bust and hip areas.
- Seam Roll, or sleeve roll, is a highly stuffed wool pillow shaped like a roll for pressing seam allowances open and pressing seams in narrow areas. It allows yo to lightly press the stitching line of the seam without applying pressure along the edges of the seam allowance.
- Clapper, is a wooden pounding block that forces steam into the garment by beating steam into the fabric to flatten seams, sharp creases and facing edges without an over-pressed look. Or, when bulky or synthetic fabrics require extra steam and pressure.
- Wooden Point Press, is a board with a sharply pointed end, used for pressing corners and very sharp points on lapels, collars and waistbands, and pressing straight seams open.
- Press Cloths, a thin piece of see-through material for protecting the right side of the fabric during pressing.
How the fabric content determines the heat setting
First, be sure you know the fabric content to determine the proper heat setting for the iron (you don’t want to burn it). Then follow the techniques below as you sew your garment pieces together. The ironing board covers should be 100% cotton because all cotton fabric absorbs moisture so that the fashion fabric will dry quickly. The traditional ironing board covers with the reflective surface, actually reflects the steam and may cause burn damage to some fabrics and slows down the drying process when you’re shaping with steam.
How to use the pressing ham
Press curved areas such as darts, buntlines, hiplines and collars over the tailor’s ham from the wrong side with the point of the dart smoothed flat over the end of the ham to shape their curve. Horizontal darts should be pressed down, and vertical darts should be pressed toward the center of the garment.
Curved seams sometimes need to be clipped slightly along the edges so they can be pressed open without puckering. Do not clip any closer to the seam than absolutely necessary to press the seam flat. Be careful not to cut pass the stitched seam.
Darts in heavy or bulky fabric will be less bulky if you slash in the middle, and then press open. Be careful not to slash so close to the point that the fabric will pull apart.
How to use the seam roll
Press seams open over sleeve or seam roll from the wrong side with the tip of the iron along the stitching line to prevent the seam edges from marking or showing through on the right side.
Follow the grain line in the fabric when pressing by moving the iron in the same direction as the lengthwise yarns of the fabric. Pressing across the grain or on the bias can stretch the garment piece out of shape.
Following the above guidelines will help you achieve your ultimate goal of sewing clothes that look professional. So, instead of a homemade looking garment, proper pressing will give you professional results and a garment you’ll be proud to say, “I sewed it myself.”
The pressing equipment is fairly easy to use as shown in this video:
More to Explore